DIY Home Energy Guide
If you can see daylight shining through the edges of your closed front door, you are essentially leaving a window cracked open 365 days a year. The U.S. Department of Energy estimates that drafts from poorly sealed doors and windows can inflate your energy bill by up to 20%.
The good news? You do not need to replace the entire door to fix the problem. A simple weather stripping door kit costs less than $30 at the hardware store and takes under an hour to install. It is one of the highest return-on-investment projects a homeowner can tackle.
In this guide, we break down exactly how to choose the right kit for your door type, how to remove the old crumbling foam, and how to install a permanent seal that will keep the cold air out and the warm air in.
1. Choosing the Right Weather Stripping Kit
Not all weather stripping is created equal. If you buy the cheap foam tape, you will be replacing it again next year. To get a permanent fix, you need to identify what type of door frame you have.
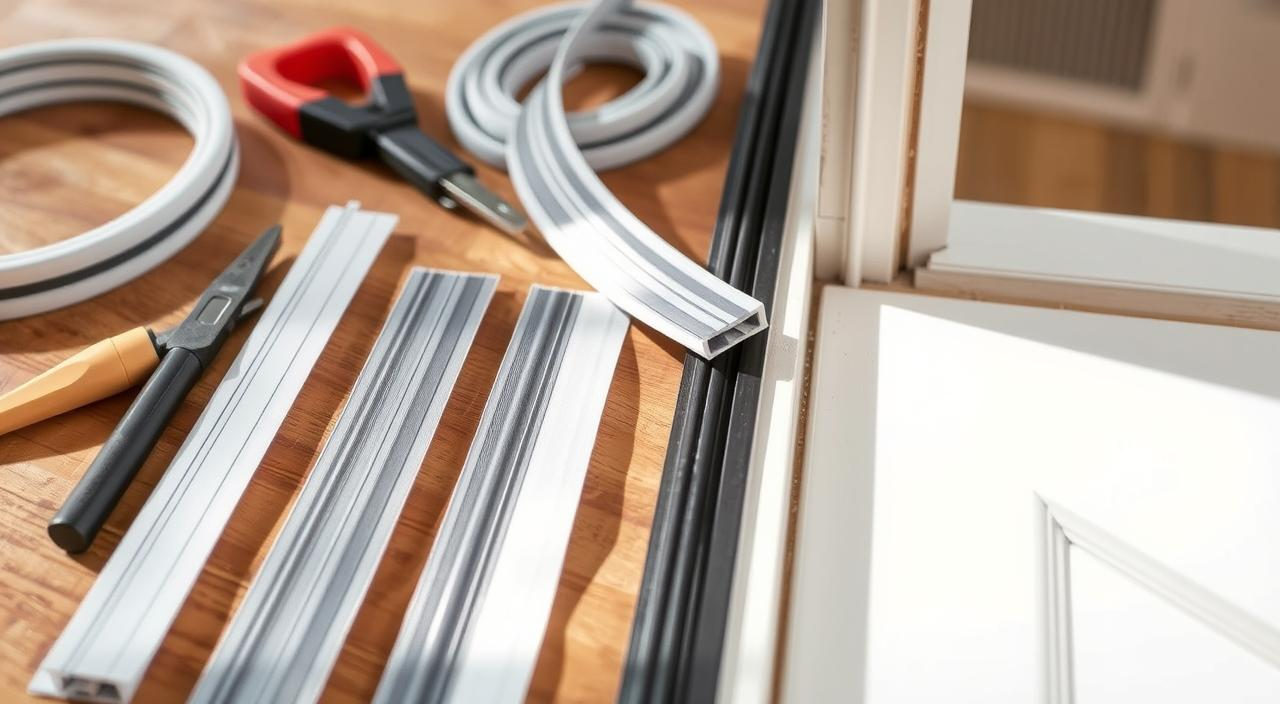
Kerf-Style Weatherstripping (Modern Doors)
Most doors built after 1990 have a narrow groove (or “kerf”) cut directly into the wooden door frame. The weatherstripping has a rigid plastic fin that presses directly into this groove. Brands like Frost King and M-D Building Products sell direct replacements. This is the most durable option available.[1]
V-Strip / Tension Seal (Older Doors)
If your door frame is flat wood with no groove, buy a V-Strip kit. This is a durable piece of vinyl folded into a “V” shape. You stick one side to the door frame. When the door closes, it presses the “V” flat, creating a powerful tension seal.
2. Tools and Materials Required
Before you begin, gather the following supplies. You will not need any power tools for this project.
- Weather stripping kit
- Tape measure
- Heavy-duty scissors or tin snips
- Stiff putty knife
- Rubbing alcohol & rag
3. Step-by-Step Installation Guide
The installation process differs slightly based on the type of seal you are using, but the preparation is the same. Do not skip the cleaning step, or your new seal will fall off within a month.
Step A: Remove the Old Material
If you have a modern kerf-style door, slide a stiff putty knife under the old weather stripping and gently pry it out of the groove.[2] If you have old adhesive foam, scrape it off completely.
Step B: Clean the Surface
Soak a rag in rubbing alcohol and aggressively scrub the door frame where the new stripping will go. This removes dirt, grease, and old adhesive residue. Let it dry completely.
Step C: Measure and Cut
Always start with the top header piece before doing the sides. Measure the top width of your door frame. Transfer that measurement to your new weather strip, and cut it with heavy-duty scissors. [3]
Step D: Install and Press
If you are installing a Kerf seal, simply press the plastic fin into the groove, starting at one corner and working your way across.[4] If you are using an adhesive V-strip, peel back just two inches of the paper backing, stick it to the top corner, and slowly pull the backing away as you press the strip down the length of the frame. Repeat this process for the two side jambs.
4. Do Not Forget the Door Sweep
Weather stripping handles the sides and top of the door, but the largest draft usually comes from the bottom threshold. If you can feel a breeze at your feet, you also need to install a Door Sweep.
Modern sweeps are U-shaped pieces of vinyl that slide directly onto the bottom of the door. Simply measure the width of your door, cut the sweep to size, open the door, and slide it onto the bottom edge. The rubber fins will drag slightly against the threshold, creating an impenetrable barrier against wind and insects.
Frequently Asked Questions
My door is hard to close after installing the kit. Did I do something wrong?
It is perfectly normal for a door to feel slightly “stiff” or require an extra push to latch for the first week after installing new weather stripping. The foam and vinyl need a few days of compression to “set” into the shape of the door.
Should I install weather stripping on the door itself, or the frame?
Weather stripping should almost always be installed on the static door frame (the jamb), not the moving door. Applying it to the moving door exposes the adhesive to constant friction, causing it to peel off rapidly.
Will a door sweep scratch my hardwood floors?
If you have a proper threshold plate installed under the door, the sweep will brush against the metal/wood threshold, not your interior flooring. If you lack a threshold, buy a sweep with soft silicone fins rather than rigid plastic to protect your floors.